Reinforcement Learning
MyoAssist’s reinforcement learning (RL) pipeline is built on top of Stable-Baselines3 (SB3) PPO and a set of custom MuJoCo environments that simulate human–exoskeleton interaction. This page gives you a bird’s-eye view of how everything fits together and where to find more information.

Reinforcement learning (RL) is a machine learning paradigm where an agent learns to make decisions by interacting with an environment and receiving feedback in the form of rewards. In the context of MyoAssist, RL is used to train control policies for human–exoskeleton systems within MuJoCo simulation environments.
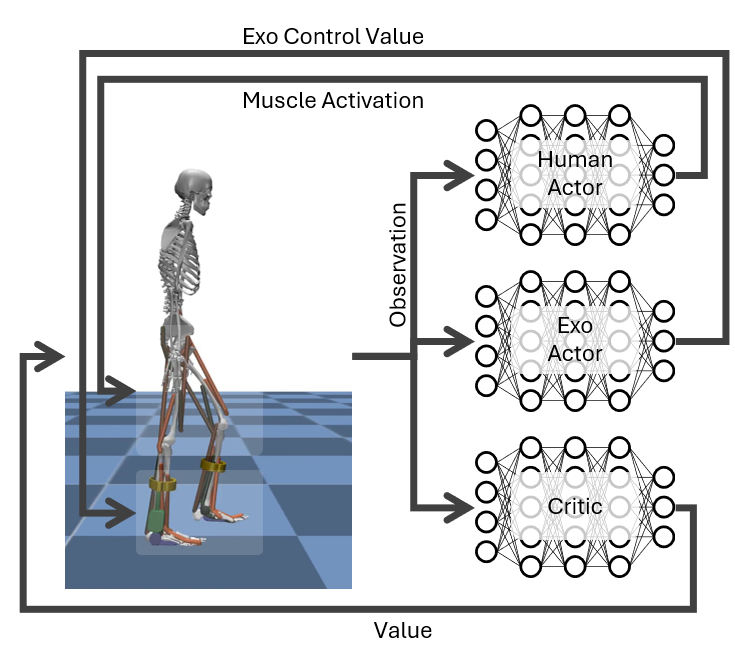
Observation Space:
In our environments, the agent receives observations that include:
- Joint angles
- Joint velocities
- Muscle activations
- Sensory data (such as ground contact, force sensors, etc.)
- etc
Action Space:
The agent outputs actions that control:
- Muscle activations (for the human actor network)
- Exoskeleton control values (for the exoskeleton actor network)
Training Workflow
- Define a config – start from an existing JSON preset or create one from scratch.
- Launch training
python rl_train/run_train.py --config_file_path rl_train/train_configs/my_config.json - Monitor progress – logs & results in
results/train_session_*. - Evaluate policy –
python rl_train/run_policy_eval.py results/train_session_<timestamp> - Analyze results – automatic plots + gait metrics saved under
analyze_results/.
Key Features
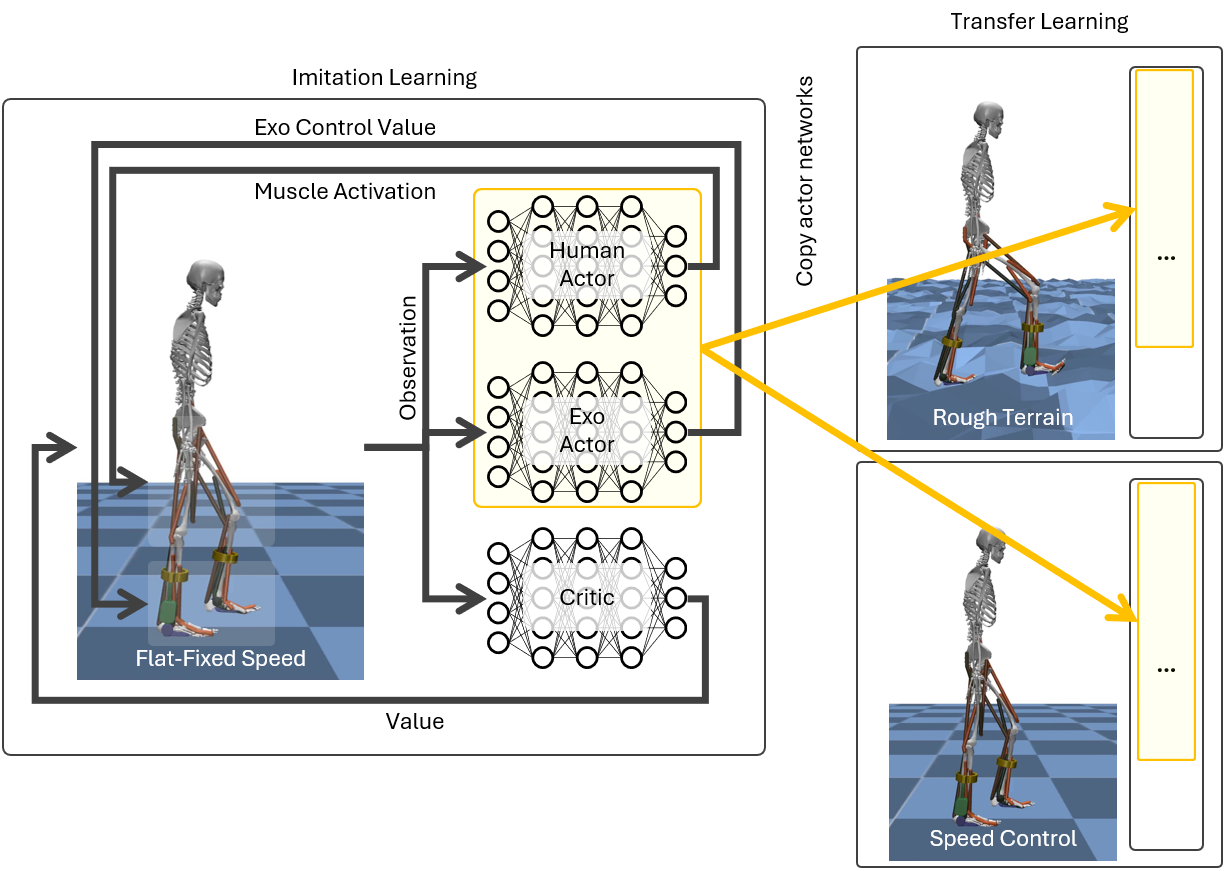
- Multi-Actor Support – Separate networks for human muscles and exoskeleton actuators (see Network Index Handler).
- Terrain Curriculum – Train on a progression of terrains from flat to rough (Terrain Types).
- Reference Motion Imitation – Optional imitation reward using ground-truth gait trajectories.
- Realtime Evaluation – Run policies in realtime with
--flag_realtime_evaluate.
Getting Started
This guide shows you the fastest way to test the RL system and run training in the MyoAssist RL system.
RL Training Entry Points
Here is a quick overview of the main entry point scripts in the rl_train folder:
| File | Purpose |
|---|---|
run_sim_minimal.py | The simplest way to create and test a MyoAssist RL environment. No training, just environment creation and random actions. |
run_train.py | Main entry point for running RL training sessions. Loads configuration, sets up environments, and starts training. |
run_policy_eval.py | Entry point for evaluating and analyzing trained policies. Useful for testing policy performance and generating analysis results. |
Quick Test Commands
1. Environment Creation Example
See how to create a simulation environment and run for 150 frames(5sec):
python rl_train/run_sim_minimal.py
- mac:
mjpython rl_train/run_sim_minimal.pyNote: If you need MuJoCo visualizer in mac os, simply use
mjpythoninstead ofpythonto run your script.
You do not need to install anything extra—just change the command:
Note:
If you see the error messageModuleNotFoundError: No module named 'flatten_dict', simply run the command again. This will usually resolve the problem automatically.
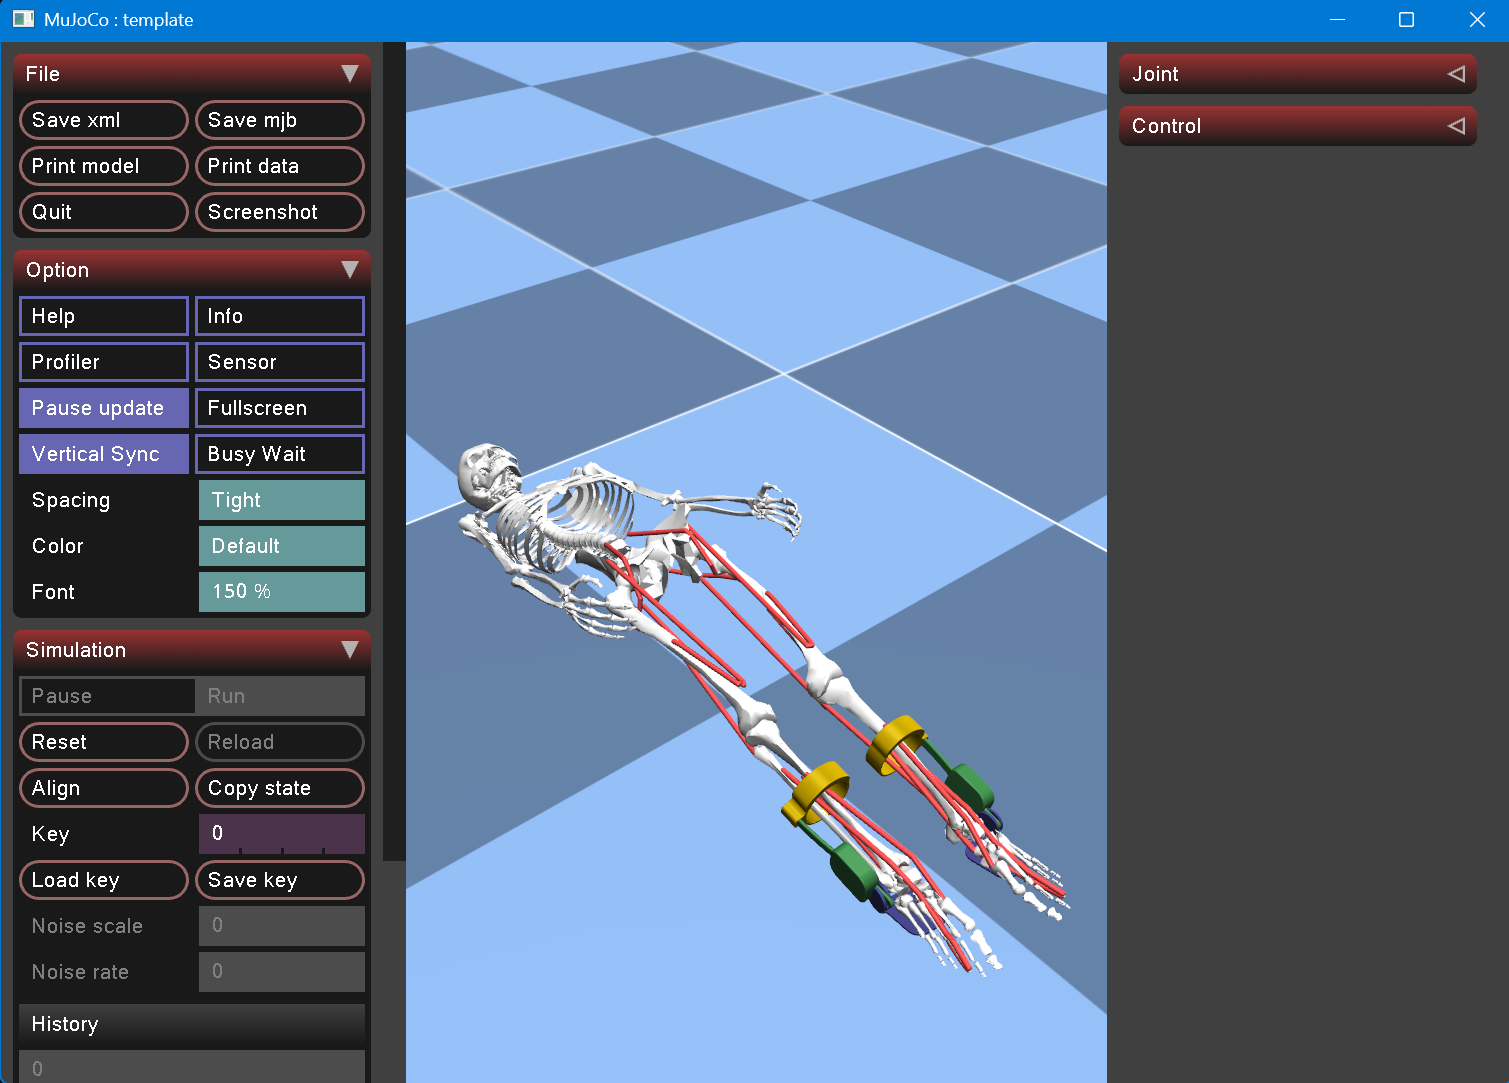
What this does:
- Shows an example of creating a Gym wrapped MuJoCo simulation environment
- No actual training - just environment creation example
Terminated vs Truncated In-depth explanation of the terminated and truncated values in Gymnasium’s Env.step API
2. Quick Training Test
Run a minimal training session to verify everything works:
python rl_train/run_train.py --config_file_path rl_train/train/train_configs/test.json --flag_rendering
What this does:
- Runs actual reinforcement learning training
- Training for only a few short timesteps
- Uses 1 environment (minimal resource usage)
- Enables rendering to see the simulation
- Logs results after every rollout (4 steps) for immediate feedback
3. Check Results
After training, check the results folder:
# Results location
rl_train/results/train_session_[date-time]/
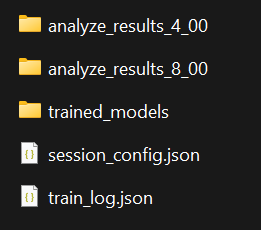
What you’ll find:
analyze_results_[timesteps]_[evaluate_number]: Training analysis resultssession_config.json: Configuration used for this trainingtrain_log.json: Training log datatrained_models/: Trained models(.zip) saved at each log interval - can be used for evaluation or transfer learning
Full Training (When Ready)
Once you’ve verified everything works, run full training:
python rl_train/run_train.py --config_file_path rl_train/train/train_configs/imitation_tutorial_22_separated_net_partial_obs.json
This file is the default example configuration we provide.
For more details, see the RL Configuration section.
Note:
The provided config setsnum_envsto 32.
Depending on your PC’s capability, try lowering this to 4, 8, or 16.
You should also adjustn_stepsaccordingly.
For example, if you usenum_envs=16(half of 32), you should doublen_stepsto keep the total batch size the same.
Policy Evaluation
Test a trained model:
python rl_train/run_policy_eval.py [path/to/trainsession/folder]
Example (evaluating with a pretrained model we provide):
python rl_train/run_policy_eval.py docs/assets/tutorial_rl_models/train_session_20250728-161129_tutorial_partial_obs
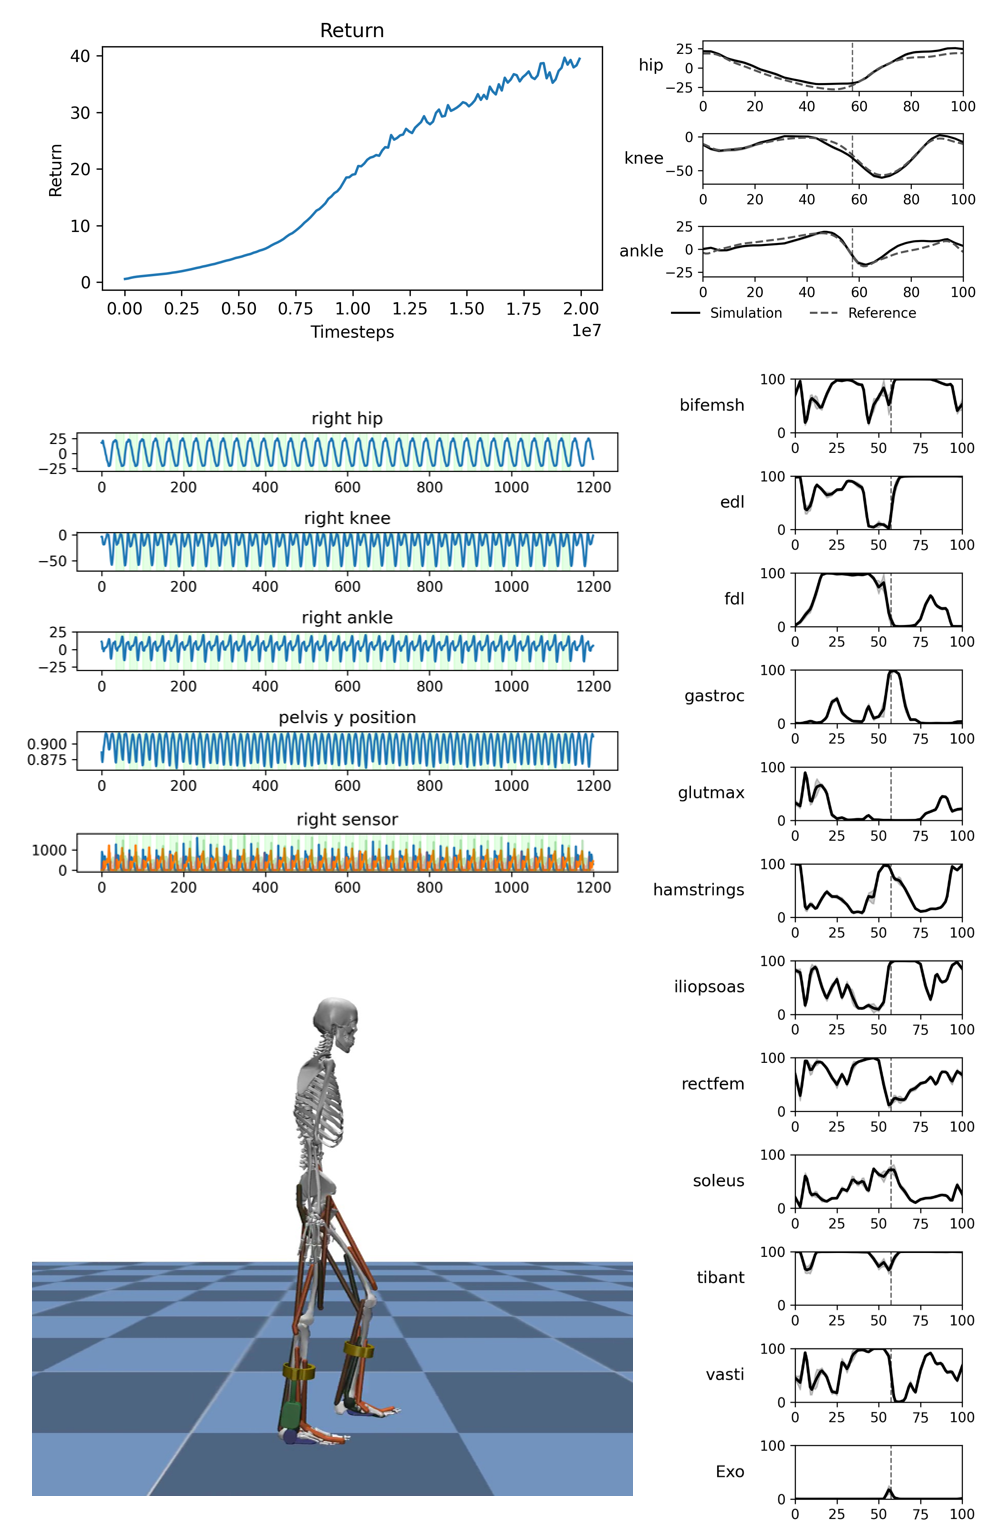
After training, an analyze_results folder will be created inside your train_session directory.
This folder contains various plots and videos that visualize your agent’s performance.
- Where to find:
rl_train/results/train_session_[date-time]/analyze_results/ - What’s inside:
- Multiple plots (e.g., reward curves, kinematics, etc.)
- Videos
The parameters used for evaluation and analysis (such as which plots/videos are generated) are controlled by the evaluate_param_list in your session_config.json file.
For more details on how to customize these parameters, see the RL Configuration section.
Transfer Learning
python rl_train/run_train.py --config_file_path [path/to/transfer_learning/config.json] --config.env_params.prev_trained_policy_path [path/to/pretrained_model]
or you can specify the env_params.prev_trained_policy_path in config(.json) file
Note: The
[path/to/pretrained_model]should point to a.zipfile, but do not include the.zipextension in the path.
Realtime Policy Running
You can run a trained policy in realtime simulation:
- windows:
python rl_train/run_train.py --config_file_path [path/to/config.json] --config.env_params.prev_trained_policy_path [path/to/model_file] --flag_realtime_evaluate - mac:
mjpython rl_train/run_train.py --config_file_path [path/to/config.json] --config.env_params.prev_trained_policy_path [path/to/model_file] --flag_realtime_evaluate
Parameters:
[path/to/config.json]: Path to the JSON file in the train_session folder[path/to/model_file]: Path to the model file (.zip) without extension. It is located in the train_models folder

Example (evaluating with a pretrained model we provide):
- windows:
python rl_train/run_train.py --config_file_path docs/assets/tutorial_rl_models/train_session_20250728-161129_tutorial_partial_obs/session_config.json --config.env_params.prev_trained_policy_path docs/assets/tutorial_rl_models/train_session_20250728-161129_tutorial_partial_obs/trained_models/model_19939328 --flag_realtime_evaluate - mac:
mjpython rl_train/run_train.py --config_file_path docs/assets/tutorial_rl_models/train_session_20250728-161129_tutorial_partial_obs/session_config.json --config.env_params.prev_trained_policy_path docs/assets/tutorial_rl_models/train_session_20250728-161129_tutorial_partial_obs/trained_models/model_19939328 --flag_realtime_evaluate